another update
Now that the days are getting that little bit longer and not as cold I am getting more done although it seems like I'm really just pulling the jigsaw apart still.
Over the last couple of days I have managed to get the transom out in one piece. The copper nails holding the planks on to the transom came out quite easily. The top plank just popped off the transom and then with very little effort the whole thing came out.
I have purchased several pieces of Amoora to edge glue to form the new transom ( 42mmM thick). All dressed and ready to go.
Laid the told transom out on the bench and traced round iton to a piece of 4 mm MDF.
Surprise surprise, its not symetrical port to stbd side a And it is out quite a bit. Fortunately the transom is symetrical where it counts; underwater, but they are different in the turn of the bilge. I will not try and change it.
I will have to shorten the boat by about 45 mm to get rid of all the old nail holes. So all the angles on the transom will change slightly.
Tonight I got stuck into the starboard side and ground off the top of all the roves and punched the nails out and removed the plank, the coaming and the rubbing strake.
The plank has been changed before as part of it is plywood and most of it is 1/2'" pacific maple.
I'm going to try and find a couple of pieces of Meranti/Pacific Maple to try and replace the planks in one piece, failing that I will have to get some Plywood and cut it out of that and then scarf the plank together. Although it is all getting problematic as I need one piece 4.8 mtr long over all. Plywood is only 1800 or 2040 long!!!!
cheers
for now
peter
our project
-
piquet95971
- Posts: 713
- Joined: 15 Oct 2009, 19:39
- Location: Forest hill Melbourne
-
piquet95971
- Posts: 713
- Joined: 15 Oct 2009, 19:39
- Location: Forest hill Melbourne
Re: our project
Things are starting to move .
The project may still look like a pile of firewood but things have been happening off the boat.
I decided to use meranti for the top plank, so I have started up the dewalt thicknesser and machined the meranti to the 7/16" that the top plank used to be. I have had to scarfed the planks together using epoxy as the adhesive. The starboard plank has been marked out in preparation for cutting it to shape. I used the old plank as a template but have made it 6 mm higher to allow for any discrepencies that the may have been in the old planking for fairing. The old top plank was so mutilated that it is hard to tell if it was a fair line for the sheer or not.
Also have fitted the transom to the back of the boat. This was done in three pieces and then dowelled and glued together. I did it this way as the 42mm thick Amoora would have been very heavy to carry back and forward to the bench as it is trial fitted and then taken out again and chiselled etc to get it to fit. The transom is sitting on the bench at the moment waiting for the epoxy to dry.
If I get home early enough tomorrow I will cut out the stbd plank and plane to the top and bottom curve.
I will also cut out the patch for the inside of the stbd plank that has to be glued into place.
As some know this boat has had a fire in it and the meranti of the top plank and the plywood of the next two planks are charred. Both port and stbd side are similarly affected. This is something that I wasn't told when I asked what needed to be done before I paid for the boat as I would probably not have gone ahead with it if I had been told!!!!.
I am going to cut a piece of 6 mm marine plywood to the shape of the plank on the inside, remove the ribs that are also burnt and then glue a plywood doubling piece over the original plywood. This will be clamped in place to allow the adhesive to dry and then when the top plank is put back on it will be nailed and roved through the whole thing. The adhesive will squeeze out through the old nail holes, this will help make for a tighter fit for the new nails. This time using slightly larger gauge nails and 1/2" roves instead of the previous 3/8". The burnt ribs will eventually be replaced as will some of the others that have cracked.
I have found a good source of most of the timber that I need and the money spent on the de walt thicknesser already has paid dividends. Still trying to find some Silver Ash or Ramin. The working with wood show is on in Melbourne at the showgrounds next weekend so I will head out there and see what may be available.
The by product is that I get plenty of shavings to put on the garden!!
cheers
peter
-
piquet95971
- Posts: 713
- Joined: 15 Oct 2009, 19:39
- Location: Forest hill Melbourne
Re: our project
a bit more prograss
Stbd plank fitted off and it does fit nicely after a bit of fairing. even if I do say so myself.
After getting a PM from Bob I have done what he suggested and screwed the plank on using some self tappers from the inside I did this using the old holes from the previous nail and roving. I used the large almost flat headed type as the diameter was the same as the previous roves. Also screwed through the ribs at the top which has held the plank in just nice. This idea has held so nicely that all the clamps are off and it is being held only by the self tappers. No adhesive as yet.
I have turned the boat around and have started to remove the port side top plank. Should have that prepared this weekend and possibly clamped and screwed in place.
Then I will square up the transom to the centreline and Glue and nail this in place except for the top plank, which will not be fixed to the transom just yet. Epoxy/Araldite will be used for the adhesive.
I have been trying to track down some Silver Ash which I want to use for the trim inside the cockpit and also for the rubing part of the coaming. It seems as this is hard to find. Plenty of yards list it on their catalogue but havent any in stock. Any leads in the Melbourne area?????
Failing that I may have to go with some Yellow Stringybark which is available in 5.4 mtr lengths. Hence no scarf joints but not quite as white as the Silver Ash.
At the rate that I am going I think I may have a floater by the end of January!!! It will probably only be the hull with no deck fitted or engine but a floater any way.
-
piquet95971
- Posts: 713
- Joined: 15 Oct 2009, 19:39
- Location: Forest hill Melbourne
Re: our project
Work continues at a good pace I am screwing everything together and then pulling it apart to then reassemble with epoxy and screws.
so it is taking double the time
Had a great win on ebay today
I have the gauges for the boat thanks to the $ value at present.
I thought that this gauge set with wiring loom and fuse panel was a good buy. May not be exactly what I was after but price/quality/good technology as opposed to historical correctness/ old style and poor technology then I think that they are winners. I wont be using the carbon fibre background .
http://cgi.ebay.com/ebaymotors/ws/eBayI ... OTORS:1123
Just have to get the senders to suit a Y block! cant be that hard can it!!!
-
piquet95971
- Posts: 713
- Joined: 15 Oct 2009, 19:39
- Location: Forest hill Melbourne
Re: our project
Achristmas update.
Over the last couple of weeks the progress has been slowed by the inclement weather in melbourne.
All the foredeck beams and deck stringers are made and screwed in place.
I have purchased the spotted gum for the ribs that need to be replaced. Yesterday these were all cut up and tomorrow will be a day on the thicknesser doing all the blanks for the ribs and some other machining as well.
I have also some Meranti for the coaming. This needs to be machined down and then scarfed to get the lengths needed. This will be done over the next couple of days ready for installing after all the deck structure is installed.
Really the next major thing to do is to nail and rove the top planks in place. Then all the deck beams can be installed permanently.
Cheers for now
Peter
-
piquet95971
- Posts: 713
- Joined: 15 Oct 2009, 19:39
- Location: Forest hill Melbourne
Re: our project
Since the last update. Top planks both port and stbd completely nailed and roved except where ribs have to replaced.
Doubling planks made for the planks port and stbd side midships. Port two glued in place and port ones nailed and roved.
Cockpit sides and minor bulkheads are all assembled and glued together so that they can be installed in one piece when the time comes for that lot to happen. Engine cover frame made.
Cover with plywood this weekend. After engine is installed I will have to work out where the additional supports will need to be placed. As at present there is only the outer 4 sides and they wont be strong enough to support a fatty (me) sitting on the cover.
My idea of being able to get the boat as a floater by end of January is looking decidely like its not going to happen!!!!!!.
more realistic is easter
I have forwarded some photos on to Greg for him to post here when he is able.
cheers
peter
- ps01.jpg (194.4 KiB) Viewed 7079 times
- ps05.jpg (231.61 KiB) Viewed 7074 times
- ps06.jpg (253.4 KiB) Viewed 7069 times
- ps04.jpg (240.45 KiB) Viewed 7066 times
- ps03.jpg (240.26 KiB) Viewed 7064 times
- ps07g.jpg (254.43 KiB) Viewed 7054 times
- ps08.jpg (232.42 KiB) Viewed 7035 times
- ps09.jpg (234.91 KiB) Viewed 7030 times
- ps10.jpg (257.58 KiB) Viewed 7012 times
Last edited by piquet95971 on 30 Jan 2011, 13:19, edited 1 time in total.
-
piquet95971
- Posts: 713
- Joined: 15 Oct 2009, 19:39
- Location: Forest hill Melbourne
Re: our project
Gosh it's getting hot again!!!
Today I cut out and shaped the 3rd doubling planks for both port and stbd side.
Both screwed in place temporarily.
Second doubling plank stud side was glued in place last night and then nailed and roved earlier today.
Peter
Today I cut out and shaped the 3rd doubling planks for both port and stbd side.
Both screwed in place temporarily.
Second doubling plank stud side was glued in place last night and then nailed and roved earlier today.
Peter
Re: our project
Pete
Pics posted.
Looking at the stem of your boat, I reckon you might have an Everingham.
Greg
Pics posted.
Looking at the stem of your boat, I reckon you might have an Everingham.
Greg
-
piquet95971
- Posts: 713
- Joined: 15 Oct 2009, 19:39
- Location: Forest hill Melbourne
Re: our project
Greg,
Many thanks for posting the photos for me.
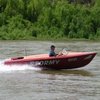
As you can see the boat has come a fair way since May when we purchased it. It looks a lot less like a pile of firewood on a trailer than it did.
Still a fair way to go though.
I would be over the moon if it was an Everingham. I am not sure though as we found references to Melbourne addresses when we were stripping the boat and some of the original woodwork would seem to be a bit too amateurish for a fairly prestigious boat builder.
That is not to say that it couldn't have been tampered with but some rank amateur along the way.
I hope to get some more work done this week although we have a one day trip to Sydney on Thursday to enrol daughter in a Masters course at Sydney University.
Would love to stay longer in Sydney and maybe catch up with some of the Sydney members but that may have to be at a later date. We have to come back again at the end of February when Emily commences her course. I hope that we can find some accommodation for her soon!!
Cheers to all
Peter Sneddon
Many thanks for posting the photos for me.
As you can see the boat has come a fair way since May when we purchased it. It looks a lot less like a pile of firewood on a trailer than it did.
Still a fair way to go though.
I would be over the moon if it was an Everingham. I am not sure though as we found references to Melbourne addresses when we were stripping the boat and some of the original woodwork would seem to be a bit too amateurish for a fairly prestigious boat builder.
That is not to say that it couldn't have been tampered with but some rank amateur along the way.
I hope to get some more work done this week although we have a one day trip to Sydney on Thursday to enrol daughter in a Masters course at Sydney University.
Would love to stay longer in Sydney and maybe catch up with some of the Sydney members but that may have to be at a later date. We have to come back again at the end of February when Emily commences her course. I hope that we can find some accommodation for her soon!!
Cheers to all
Peter Sneddon

Re: our project
Peter,
A good way of confirming whether its an Everingham is by looking for clinched nails every 18 inches or so
along the planks which dont have roves, nor run through ribs.

Darren
A good way of confirming whether its an Everingham is by looking for clinched nails every 18 inches or so
along the planks which dont have roves, nor run through ribs.
Darren
Return to “Restoration Help and Advice”
Who is online
Users browsing this forum: No registered users and 13 guests