our project

Any questions? We will try and help.
blown292
Posts: 50
Joined: 09 Oct 2009, 17:28

Re: our project

Postby blown292 » 14 Jul 2010, 22:13

http://i35.photobucket.com/albums/d189/ ... 011163.jpg

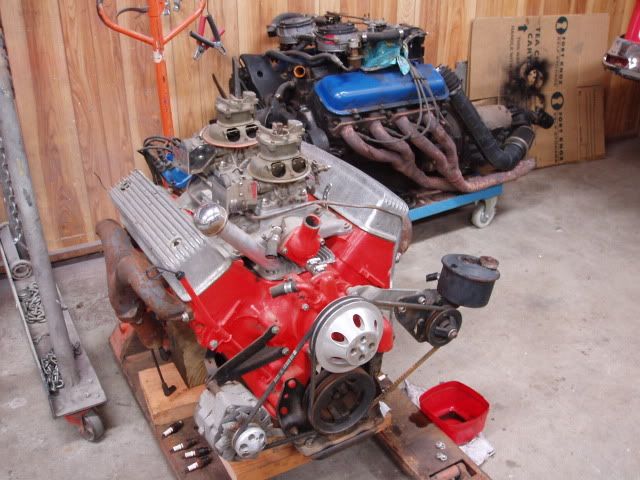
Heres a good pair, the Y block is heavier and bigger than the big block 454. At least pushing them around its heavier.

Here is good way to get the bits. A guy imported a 56 pickup with this pretty new engine with all the good stuff in it , didnt like it and pulled it out for a windsor. Dad flew up to NSW and dragged it back as a spare for his car, bugger he was quicker than me :D

ikoolmarz
Posts: 16
Joined: 22 Mar 2009, 21:38

Re: our project

Postby ikoolmarz » 15 Jul 2010, 16:34

Hey Dale. i checked the weights on some engines, a small block chev is about 575 pounds
a big block chev is about 685 pounds
a Y block is about 625 pounds ,but dont foget, after you get rid of that timing cover
its gets a little lighter , and in saying a Y block sounds sweeter than a small block
chev you got that right , and my little y block came off the dyno making 320hp
not bad i thought
. but you know the deal , you wanna play you gotta pay.
We were thinking of setting up the X hollman moody duel quad 427 sideoiler stroker we had in the
fairlane wich made over 600 hp , in hustler , [Mandy] but you know what , were happy
just to have it the way it is FOR NOW. :mrgreen:

blown292
Posts: 50
Joined: 09 Oct 2009, 17:28

Re: our project

Postby blown292 » 16 Jul 2010, 06:19

Hi mate
Do it stick it in there.... :D and bring it to Narrandra ;)
Didnt think there was much in the weight difference, your right that timing cover is a great chunk of steel.
Have to catch up with you guys soon, cheers

piquet95971
Posts: 713
Joined: 15 Oct 2009, 19:39
Location: Forest hill Melbourne

Re: our project

Postby piquet95971 » 05 Aug 2010, 19:58

Today was a quiet day for work. weather in melbourne has been really cold so work has slowed down.
Instead of making money I decided to spend some well at least time on the project.
Progress on the project has been slow due to the cold weather but will probably move along reasonably now.

Boat and trailer moved into carport where it is at least dry if not entirely warm. I spent today bolting in the engine bearers thwey are not finished as the oregon needs to be run through the thicknesser to get the finalnice smooth finish, before varnishing. At least bolting them in place in the raw state I can see that they fit and it gives me a strong point from which to lift the boat off the trailer without it folding up. Angle brackets made and bolted through the Keel with 316 Stainless Steel nuts and bolts.
I tried a trial lift with an engine crane and all seemed well.

Made a cradle to sit the boat on this will be the working cradle at close to a good height for working so that planks and ribs can be replaced as required. The lift and transfer will will probably happen on the weekend
cheers for now
peter

User avatar
bootlegger
Posts: 1472
Joined: 09 Mar 2009, 20:18

Re: our project

Postby bootlegger » 06 Aug 2010, 07:54

Keep at it mate

piquet95971
Posts: 713
Joined: 15 Oct 2009, 19:39
Location: Forest hill Melbourne

Re: our project

Postby piquet95971 » 25 Aug 2010, 14:34

an update
Things have been progresing although it may seem to some that I am going about the job in an unusual way.

All the forward deck beams have been made and installed using 19 mm Pacific Maple/ Meranti.
Previously the fore deck stringers all ended at No 1 deck beam where they were just butted against the beam and nailed through the deck beam into the end grain of the stringer. Not real strong!
Now they will end at the same deck beam but I have made a second beam/reinforcing that is presently screwed to therear of No1 deck beam. This will eventually be glued and screwed to the deck beam with the deck stringer cut outs checked out of the reinforcing. The deck stringers will also be glued and screwed. Previously they were nailed and not glued.

I have obtained a Stainless Steel fuel tank from EBay and have worked out where to fit it if not exactly how yet. This has meant the the Aft deck beam of the rear cockpit has had to be moved forward. This beam is made from 30 mm Pacific Maple/ Meranti with a reinforcing beam also screwed to the back of it. This may seem a bit heavy but someone is bound to want to use the rear deck as a seat. At least this way its not going to break and besides it doesn't add much weight overall.

The reasons that I have made and installed the deck beams before doing any plank or rib work is that when I obtained said boat all the deckbeams and cockpit sides were siting in the bottom of the boat NOT ATTACHED TO ANYHING. So guess what the boat had decided that it wanted to be about 60mm wider that it probably should be. So by making the beams and installing them even on a temporary basis I will get the hull back into somewhere near where is possibly started!!!! Well thats my reasoning.

The top plank on both sides has previously been replaced as it is part plywood and part Pacific maple. The port side top plank has had an additional repair carried out ( and very poorly) at a later stage. The plank has had a new section let into it for about 2500 x 50 mm into a plank 100 mm wide and 3.6 mtr long.

All the other planking on the boat is Plywood.
I suppose that the next jobs to takle will be
The breast hook and the quarter knees probably laminated or may be the cheats way of solid timber cut at 45 degrees to the grain.
The the Transom. This I will be laminating up out of Meranti with a Huon Pine slash across the top.

Now for my question.

There is paint on the inside of the boat. What is the general thought of getting this blasted off with Soda blasting. I would like to varnish the inside of the boat and this will get it back to bare timber and remove the paint at the same time.
How gentle is it on the exisiting timber surfaces?

cheers
for now peter
project co ordinator

bauchy
Posts: 535
Joined: 11 Mar 2009, 20:34

Re: our project

Postby bauchy » 25 Aug 2010, 19:31

hey peter,
project is sounding great. be good to see it complete.
i spoke to a sandblaster early last week about blasting the hull. the guy in bendigo does allot of boats and he uses garnete. he says soda isnt as effective and he doesnt damage any timber. gets 99% of the paint off. he charges $250 an hour and said allow 4 hours to get inside and out side of a boat done.

ive done it by hand sanding and scraping with mine and id never consider it again.

brian

User avatar
viteau
Posts: 145
Joined: 19 Mar 2009, 19:50
Location: Uralla

Re: our project

Postby viteau » 25 Aug 2010, 21:02

G'day Guys
I had my boat sand blasted in Adelaide. I can't tell you what they used but it did eat the timber but because it was 40yrs old it didn't do any harm as it lets the paint get a better grip to fresh wood.
Cheers Chris
Attachments
boat photos 1903070001.jpg
boat photos 1903070001.jpg (64.21 KiB) Viewed 7298 times
018.jpg
018.jpg (121.69 KiB) Viewed 7312 times

piquet95971
Posts: 713
Joined: 15 Oct 2009, 19:39
Location: Forest hill Melbourne

Re: our project

Postby piquet95971 » 04 Sep 2010, 19:02

All deck beams are now made and also the port cockpit side. Hopefully tomorrow the Starboard side will be made. I will leave these in while i do the transom and then take the beams out to do the gunwhales, rubbing strake and the top planks. I will probably get the inside soda blasted after I do the top plank so that all the inside will look the same.
I have some photos of what has been achieved so far and will post them soon
cheers
peter

piquet95971
Posts: 713
Joined: 15 Oct 2009, 19:39
Location: Forest hill Melbourne

Re: our project

Postby piquet95971 » 07 Sep 2010, 19:32

Both cockpit sides now made and installed on a temporary basis. They will then be removed and stowed away while the other necessary work is done. At least this way i have most of thises parts prefabricated so it will probably be quicker to install them at a later date, well thats the idea.

This boat has previously had a fire in side and some of the planks are scorched also some of the ribs. They are not a real problem. I am considering not replacing the planks. I intewnd to remove all the ribs that are affected and then but glueing a thin 6mm plank on the inside of the hull This plank would also be nail and roved through the outside plank as well just above the usual line of nails and roves. Then new ribs made and refitted. This will mean longer nails but they are relatively easy to find.

The glue that I am considering using is the 3m 5200 polyurethane. Is this a good choice for this situation? How is it for gap filling? ther is another glue that I amlso considering using called "Vise". It is also a polyurethane glue and if its anything like the properties of Sikaflex then it should be great stuff.
cheers
peter


Return to “Restoration Help and Advice”

Who is online

Users browsing this forum: No registered users and 19 guests