our project
-
bootlegger
- Posts: 1472
- Joined: 09 Mar 2009, 20:18
Re: our project
The boat looks great peter. None of the pics you sent loaded up. Even the second time.
-
piquet95971
- Posts: 713
- Joined: 15 Oct 2009, 19:39
- Location: Forest hill Melbourne
Re: our project
By way of explanation.
The whole project has been was a bit of a family affair so when it came to a name it was collective. Megan (wife) and Emily (daughter) have a favourite TV program Big Bang theory. Well Sheldon is a bit OCD and "different" so when the boat was looking so different to others and I was a bit OCD about getting it completed and getting it right it seemed quite apt.
The name 'Bazinga' is what is said by Sheldon when he and Leonard are playing in the big playpen full of coloured balls. Sheldon also says 'Bazinga' when he is serious but it turns out to be a joke and a lot of people thought I was joking about restoring a boat.
http://www.youtube.com/watch?v=0MrDe_2eW10
It also happens to be the name of an obscure Australian jelly fish!!
Which comes in handy when we don't know what brand, when or who built this boat in the first place.
http://en.wikipedia.org/wiki/Bazinga_%28genus%29
so there we have it
cheers
Peter and the rest of the Sneddon Family
-
piquet95971
- Posts: 713
- Joined: 15 Oct 2009, 19:39
- Location: Forest hill Melbourne
Re: our project
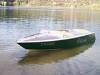
Thank you, Greg, for organising the display and for posting the photo for me.
The source of the name is a bit obscure. Now to finish getting the electrics and fuel system sorted out and then for the launching.
The boat survived the trip to and from the display but the light board half fell off on the way home. Now have to look at a better way of mounting the light board.
The source of the name is a bit obscure. Now to finish getting the electrics and fuel system sorted out and then for the launching.
The boat survived the trip to and from the display but the light board half fell off on the way home. Now have to look at a better way of mounting the light board.
-
piquet95971
- Posts: 713
- Joined: 15 Oct 2009, 19:39
- Location: Forest hill Melbourne
Re: our project
I have taken your advice Greg and am tracking down an electric fuel pump to replace the mechanical that now won't fit in place after changing the exhaust bends to pick up the original discharge points through the transom.
Also tomorrow I will get the blank for the windscreen.
I will also work out how and where to mount the battery over the next couple of days.
Also tomorrow I will get the blank for the windscreen.
I will also work out how and where to mount the battery over the next couple of days.
-
piquet95971
- Posts: 713
- Joined: 15 Oct 2009, 19:39
- Location: Forest hill Melbourne
Re: our project
The progress continues with "Bazinga". This week along with work and family commitments I have managed to get the Perspex for the windscreen,some rubber radiator hose and worm drive clips. Today I cut and shaped the windscreen Perspex. It is installed but has to be taken back out again to peel the protection paper off and to install the side windscreen pieces. The exhaust rubbers have been cut and installed.
I'm intending to use a small yet powerful Odyssey battery. I have a spare one for the XU1 so that will save some money to not have to buy another one. There is a really good mounting cradle for it which I have as well.
Megan is a little incapacitated at present so her situation is also consuming a fair bit of time as well.
If all goes well from here on I might try for a launch over Easter just to see if it floats and get an idea of how much it leaks. By then I'll have the bilge pump up and working and I doubt that I will take it off the trailer just to be on the safe side.
-
piquet95971
- Posts: 713
- Joined: 15 Oct 2009, 19:39
- Location: Forest hill Melbourne
Re: our project
It has been quite a while since I've done anything on the boat at all.
I have now started to pretend to be a Marine Electrician!
Wiring had been run through under the deck quite a while ago. Fortunately I tagged all the wires and also did a wiring diagram so I was able to start where I left off.
Over the last week I have put connectors on the wires and run them to their respective points on either the fuse board or the engine. The wires may have to be shortened but they are where they should be. I have wired in a relay into the starting circuit just to help.
I am not entirely sure that I have done it exactly right so I will get an Auto Elec. from the car club to come and give it the once over before I add power to the system.
Tomorrow I will start running the wiring for the radio and the most important item in/on the boat, the bilge pump.
At this rate we might even be a starter for the Australia Day Yarrawonga bash with a boat, one can but try.
Re: our project
Hi Peter, We had the same problem with custom made fibreglass cabinets which had to be done again because the exhaust elbows were to wide. The jigsaw was always handy as soon in the photo for pulleys and alternator. The loss of skin on knuckles is worth it for the end result as you will have a story to tell for each stage of your restoration. Keep up the good work and hope to catch up on the water one day. Cheers Chris
- Attachments
-
- unnamed.jpg (9.13 KiB) Viewed 5423 times
-
piquet95971
- Posts: 713
- Joined: 15 Oct 2009, 19:39
- Location: Forest hill Melbourne
Re: our project
Nearly 2 weeks have gone past and the starter motor issue is resolved. Staying with the original. Not sure how I'm going to resolve the interference problems but the problems associated with going with a new starter meant me having a rethink.
It meant taking off the flywheel and grinding a lead on the teeth on the back of the ring gear and no one could assure me that the ones that I found would suit my application.
So I have been concentrating on running the wiring and getting it both neat and to the right points. It is amazing how much time it consumes.
I HATE WIRING!
I swear that half of what I have already run has had to be moved, changed or rerouted and I'm still not sure that I haven't got it correct.
At the same time I'm doing a wiring diagram which I hope that I wont ever have to need to refer to but it's better than just winging it.
I rekon that I'm going to have to move the ignition switch.
I have found that the carby that I have which is a Holley 2bbl model 2487 is off a 1960-62, 292 Y block V8 truck. It turns out that it is a 400cfm Ford Holley,
Talking to the Holley people here in Melbourne they believe that it would be better to go to a 500cfm rather than drop to a 350. I will probably go with a remanufactured one as the budget doesn't quiet stretch to a brand new one.
The major things still to purchase and install are:
The Carby, Throttle cable and accelerator pedal, gear shift cable. Although I'm thinking that I might just leave the damn thing in gear at first. Probably better to get it going first.
I will probably take the distributor out and get it overhauled. I just hope that it's not beyond repair. Fortunately Scorcher Ignition are just around the corner. They are very good and have looked after the distributors in my other cars. If they can't fix it then it probably cant be done!!
That all for now
Peter
Last edited by piquet95971 on 05 Dec 2014, 23:28, edited 2 times in total.
-
bootlegger
- Posts: 1472
- Joined: 09 Mar 2009, 20:18
Re: our project
Keep plugging away. You will get there in the end. Then you have to start fixing stuff as it breaks.
-
piquet95971
- Posts: 713
- Joined: 15 Oct 2009, 19:39
- Location: Forest hill Melbourne
Re: our project
Thanks Dave for the encouragement.
More chipping away today.
Bought the correct Fuel Pump today and bolted that in place.
It's amazing how different people are in regard to Carby Sizes
The one I have is from a 60-62 ford 292 truck believed to be a 400 Holley.
One place says go to a 500 CFM another says 350 CFM.
No I'm not sure which way to jump. The plugs that were in the engine were very sooted up, which means it was probably a bit on the rich siide so I'm thinking over fueled with the bigger carby. Not having played with Holleys for a long time I'm not sure though. I will have to see if I can find my Holley book and have a look.
Any body here got any advice?
This arvo was spent putting in the new Fuel Pump, routing the fuel line and then tidying up and rerouting some more wiring. Also drilled a hole in the back of the front seat to give the bendix on the starter motor clearance. That is much cheaper than a new starter!! and noone will see it (much) now that Ive told you guys.
With the wiring I'm just about happy with the basic stuff that I have set up. I think that is OK. The only thing I'm not happy with is the position of the ignition switch. The terminals on the back are, in my opinion, too close to the steering cables. So I may change the position and then fill the hole with something else. Not sure what yet. Still not willing to put power to the circuit YET!
I saw on the Classic boats FB page an adaptor for draining the oil without ending up with a bilge full of oil. I'll possibly have a look at making something similar using speed pro type fittings. Seems like a good idea.
More updates soon.
Return to “Restoration Help and Advice”
Who is online
Users browsing this forum: No registered users and 89 guests